
The Current Balance and Production Editor (accessible via the Resource Summary page) will allow you to:
- View a summary of your resources' balances that will update as you make modifications to your resources
- View and edit each your resources' current balances
- View and edit your resources' attributes
- View and edit production data for each one of your resources
- View, edit, and create change records
- Assign contracts to your resources
Adding Objects to the Editor
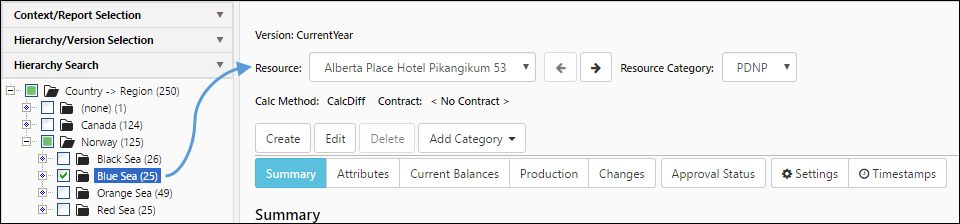
Before you start working in the editor, use the hierarchy to select the objects you intend to work with, and add the objects to the editor. Follow these steps:
- Select a hierarchy to display your data from the Hierarchy drop-down menu in the Hierarchy/Version Selection pane.
- Select the version of your data you wish to work with using the Version drop-down menu in the Hierarchy/Version Selection pane.
- Toggle the checkboxes beside levels or reservoirs in your hierarchy that you wish to work with.
- Click on the level of your hierarchy that includes all the objects and/or levels you selected.
Click image to expand or minimize.
Each one of the reservoirs you selected will be added to the editor. You can quickly alternate between the resources you selected using the Resource drop-down menu near the top of the Display pane. You can also use the left and right-facing arrows ( ) to cycle between the reservoirs listed in the Resource drop-down menu.
Negative Values
Before you enter the edit mode, negative values will appear in parentheses throughout the Current Balance and Production Editor (e.g., -1234.56 will appear as "(1234.56)" in the tables of the editor). When you enter the edit mode, use a hypen "-" to enter negative values into the editor's tables.
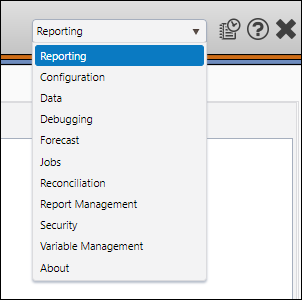
The Navigation Ribbon
Once you've added the reservoirs you intend to work with to the editor, use the Navigation Ribbon (visible below) to access the different parts of the Current Balance and Production Editor.

- Select Reporting from the Navigation Toolbar.
- Select Reconciliation from the Context drop-down menu in the Context/Report Selection pane. The Reconciliation tab will become available.
- Click on the Reconciliation tab, and then the Resource Summary page.
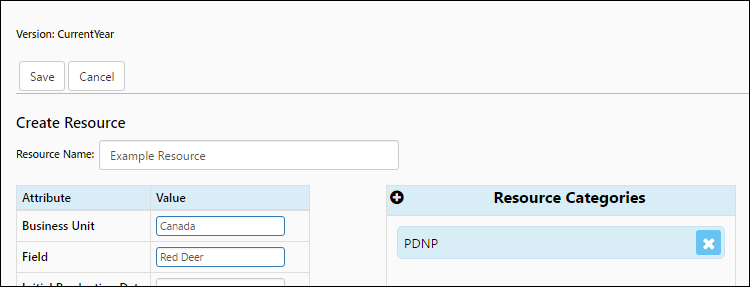
Create a New Reservoir
To create a new reservoir, follow these steps:
- Select the version within which you want to create a new reservoir using the Version drop-down menu in the Hierarchy/Version Selection pane.
- Access the Resource Summary page.
- Click the Create button near the top of the Display pane.
- First, enter a name for your reservoir in the Resource Name field.
- Use the table on screen to enter attribute data associated with your reservoir. These attributes will be used to categorize your object within the hierarchy.
- Add Resource categories to your object by clicking the Add symbol (
 ), and then selecting the categories required for your new reservoir.
Click image to expand or minimize.
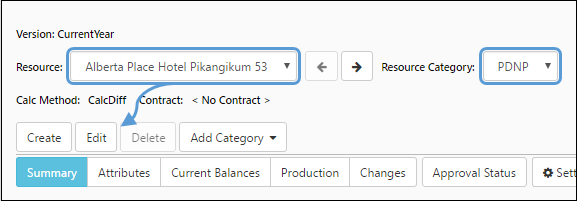
Edit Data
To edit data using the Current Balance and Production Editor, follow these steps:
- Select the reservoirs you wish to work with, and add them into the editor using the hierarchy.
- Select a reservoir and resource category using the Resource and Resource Category drop-down menus.
- Click the Edit button. After entering the edit mode, you can make changes to your resource using multiple tabs within the editor prior to saving your changes.
- Once you have added all of your changes, click the Save button.
At any time during the editing process, use the Reset button near the top of the Display pane to revert all of the changes you have made to their initial values.
Unsaved Changes
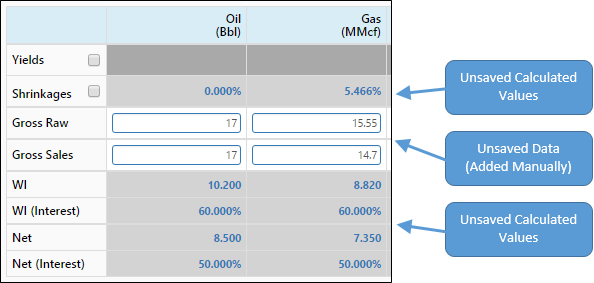
Before changes you make using the editor have been saved, formatting will be applied to unsaved data. In the example below, a contract was applied to a reservoir, and Gross Raw and Gross Sales product volumes were added to the table.
- If you add a value to a cell manually, the cell's border will turn blue prior to being saved.
- If a value is calculated based on the relationships in the table and has not yet been saved, the value in the cell will be bolded and colored blue.
Both types of conditional formatting are visible in the table below:
Click image to expand or minimize.
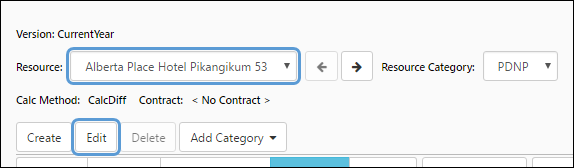
Apply a Contract to a Resource
After you enter the edit mode, you can apply contracts to your resources. To apply a contract to a resource, follow these steps:
- After adding data objects to the editor, select the resource you wish to apply a contract to using the Resource drop-down menu.
- Click the Edit button.
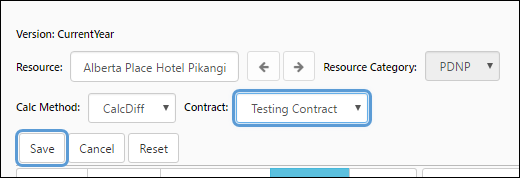
- Select the contract you wish to apply to your resource using the Contract drop-down menu.
- Click the Save button to save your changes.
Applying a contract to a resource while using the Current Balances tab will add interest factors from the contract to the table on screen. In the example below, working interest and net product volumes were calculated automatically based on the contract's ownership factors.
One Resource, One Contract
Contracts work in an all-or-nothing fashion. This means that you won't be able to pick and choose ownership data from your contract that you wish to apply to your resource (i.e. using a contract to only control your production volumes is not possible). Additionally, you won't be able to assign multiple contracts to a single resource. All of the ownership factors configured in your contract will be applied to the resource simultaneously.
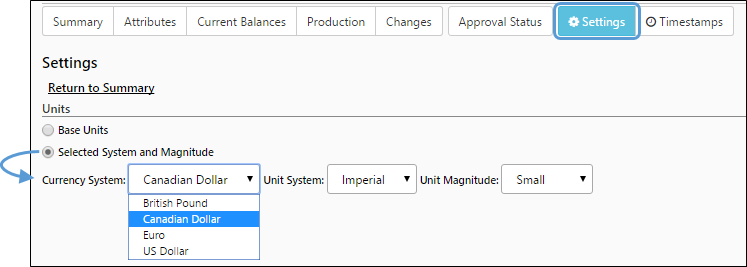
Apply a Unit Conversion to your Data
Use the Settings tab (found to the right of the Navigation Ribbon) to apply a unit conversion to data found on the Resource Summary page.
- Click on the Settings tab to the right of the Navigation Ribbon.
- Toggle the Selected System and Magnitude option.
- Set up your conversion:
- Select a currency from the Currency Systems drop-down menu.
- Select units from the Unit Systems drop-down menu.
- Select a magnitude using the Unit Magnitude drop-down menu.
Click image to expand or minimize.
Use Timestamps to Verify your Data
When certain types of data changes are made outside of the editor, you will be notified. These changes include:
- Modifications to your production data (via loaders, or the Resource Editor Page)
- Modifications to active contracts
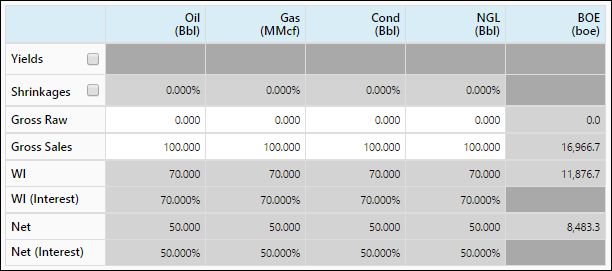
The image below shows a resource's balances before modifying its contract. For this example, 100 units of each product were added to the reservoir.
Click image to expand or minimize.
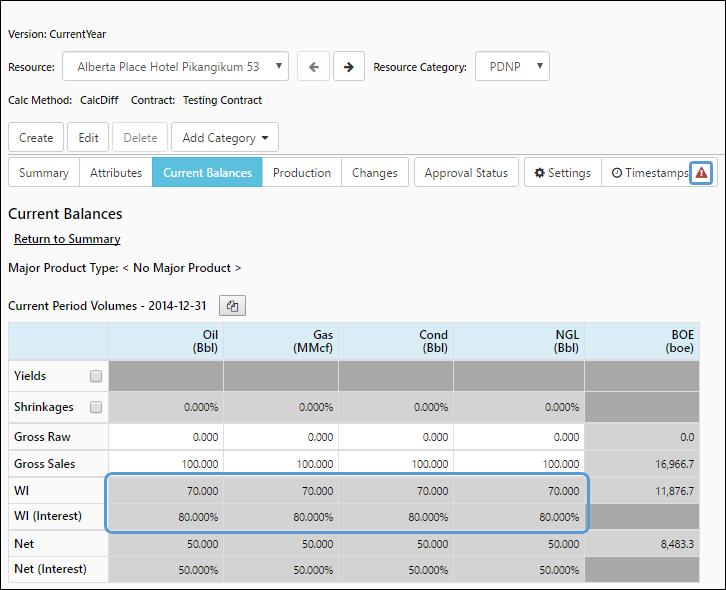
Now, the contract's percent working interest was changed to 80%.
Click image to expand or minimize.
As soon as changes are made to the contract, a warning symbol appears beside the Timestamps button. Additionally, the working interest percentage for all products is now listed at 80%. However, only 70 units of the products are listed in the table. Despite the percentage alterations, product balances are still the same. This is done to prevent accidental alterations of your product balances. Clicking on the Timestamps button will reveal something similar to the following:
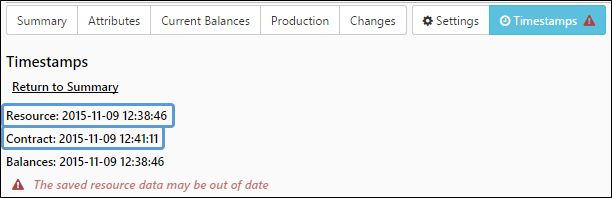
As you can see in the image above, the resource's last-saved time is earlier than the last-saved time of the contract. This is what triggered the warning in this example.
The table below describes each one of the timestamps displayed on this page:
| Timestamp | Description |
|---|---|
| Resource | The last time the resource's data was saved while using the Current Balance and Production Editor. |
| Contract | The last time that the resource's contract was saved. |
| Balances | The last time the resource's data was updated and saved outside or while using the Current Balance and Production Editor. |
Resolving Timestamp Warnings
When the working interest ownership factor was adjusted in the example above, the updated percentage was included in the table, but the working interest product balance was not updated. To correct this, enter the edit mode. As soon as you enter the edit mode, your balances will be calculated and corrected. Click the Save button to update your balances. When you do, the warning icon beside the Timestamps button will disappear.
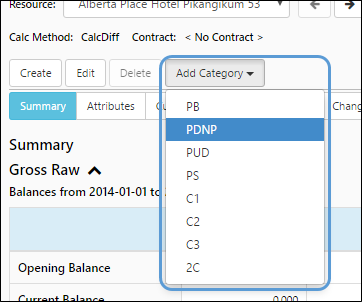
Add Resource Categories to Reservoirs
To add Resource (Reserve) Categories to a resource, click on the Add Category drop-down menu above the Navigation Ribbon and select the reserve category you wish to add.
Click image to expand or minimize.
The reserve category will be added to the reservoir and the edit mode will automatically be activated. Once you have finished making changes to your new resource category, remember to save your changes before leaving the editor.
Inactive Resource Categories
After a resource category has been deactivated, you won't be able to add it to any of your resources; however, you'll still be able to modify the current balances and production volumes for resources that were already associated with the deactivated resource category (unless the resource's version is locked).
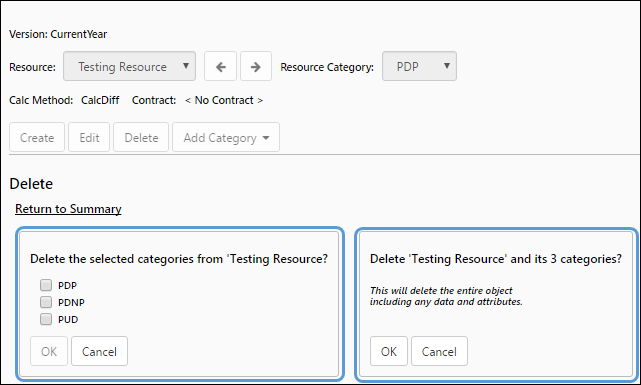
Delete Resources and Reserve Categories
To delete resources or reserve categories, select the resource you wish to modify or delete from the Resource drop-down menu near the top of the Display pane, and click the Delete button.
The appearance of this page will vary depending on the object you are trying to delete.
Delete Entire Resources
You will only be able to delete an entire resource if:
- The resource's opening balance is zero.
- The resource does not belong to a locked version
If both of these are true for the reserve you are trying to delete, a block similar to the Delete 'Testing Resource' and its 3 categories? block visible below will appear. Click the OK button to delete the entire resource, along with all of its resource categories.
Deleting Resource Categories
You will only be able to delete a resource category if:
- It does not contain any data
- It does not exist in a locked version
If both of these are true for the reserve category you are trying to delete, a block similar to the Delete the selected categories from 'Testing Resource'? block featured in the image below will appear. Toggle the checkbox beside the resource category you wish to delete and click the OK button.
Click image to expand or minimize.
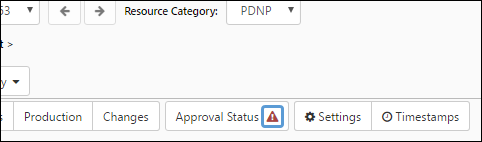
Check the Approval Status of your Resources
You can monitor the progress of your resources through your approvals using the Approval Status tab.
As your resources are approved, the table on this page will update.

Click image to expand or minimize.
Objects that are approved in active and/or finalized approvals will be locked.

Approval Notifications
Each time a resource's approval status changes, a notification will appear inside the Approval Status tab.
Creating Contracts
Contracts play an important role in the Current Balance and Production Editor. For more information on contracts, see The Contracts Tab.